Excel "What if?" analysis with Python - Part 4: Project management and packaging

In the first three notebooks, we've developed some Python approaches to typical Excel "what if?" analyses. Along the way we explored some slightly more advanced Python topics (for relative newcomers to Python) such as:

  • List comprehensions,
  • Basic OO programming, creating our own classes and using things like setattr and getattr,
  • Leveraging scikit-learn's ParameterGrid class,
  • Faceted plots using Seaborn and matplotlib,
  • Tuple unpacking, zip, and itertools,
  • Safely copying objects,
  • Root finding with, and without, scipy.optimize,
  • Partial function freezing and lambda functions,
  • Using numpy.random to generate random variates from various probability distributions,
  • Using scipy.stats to compute probabilities and percentiles,
  • Importing our data_table, goal_seek and simulate functions from a module.

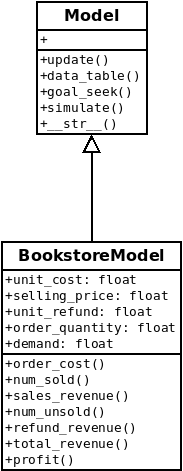
Now that we've got a critical mass of "proof of concept" code, let's figure out how to structure our project and create a deployable package. In addition, let's rethink our OO design and add some much needed documentation to the code.

Python packaging basics

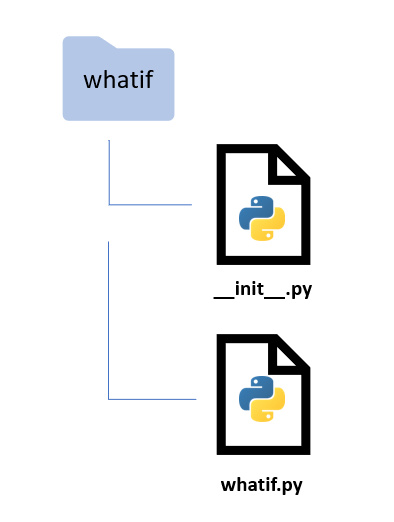
What is a Python module? What is a Python package? A simple way to think about it is that a module is a Python file containing code and a package is a folder containing Python files and perhaps subfolders that also contain Python files (yes, there are many more details).

There are tools for turning such a folder into packages that can be uploaded to places like PyPI (Python Package Index) or conda-forge (if you've used R, think CRAN) from which people can download and install them with package installers like pip or conda.

If you are new to the world of Python modules and packages, a great place to start is the tutorial done by Real Python - Python Modules and Packages - An Introduction. After going through the tutorial you'll have some familiarity with concepts needed in our tutorial:

  • Python modules and how Python finds modules on your system,
  • the different ways of importing modules,
  • exploring the contents of modules,
  • executing modules as scripts and reloading modules,
  • Python packages, the __init__.py file, importing from packages, and subpackages.

Other good high level introduction to modules, packages and project structure are:

  • Welcome to Python Packages!
  • The Hitchhikers Guide to Python: Structuring Your Project.

Of course, one should also visit the official Python Packaging User Guide (start with the Overview), especially with the ever evolving nature of this topic. See this recent series of posts on the State of Python Packaging for an "exhausting (hopefully still kinda high level) overview of the subject".

With a basic and limited understanding of Python packages, let's get to turning whatif.py into a package.

python_package

Creating a new project using a cookiecutter

Back in Module 2, we learned about cookiecutters and used a simple cookiecutter for a data analyis project. That cookiecutter really isn't appropriate for a project in which we intend to create a Python package from our source code. Instead, we'll use another cookiecutter I've created called cookiecutter-datascience-aap. Let's check out the GitHub page for this cookiecutter and note the differences between it and the simple cookiecutter template we used in Module 2.

Ok, let's create new project called whatif. To start a new project, open an Anaconda prompt and:

cd <some folder within which the new project folder will get created>
conda activate aap
cookiecutter https://github.com/misken/cookiecutter-datascience-aap

You'll get prompted with a series of questions and then your project will get created.

Overview of cookiecutter-datascience-aap project structure

We won't get into all the details now, but there's a few things about the folder structure that we should discuss. Here's the structure:

├── whatif
    ├── LICENSE
    ├── README.md          <- The top-level README for developers using this project.
    ├── data
    │   ├── external       <- Data from third party sources.
    │   ├── interim        <- Intermediate data that has been transformed.
    │   ├── processed      <- The final, canonical data sets for modeling.
    │   └── raw            <- The original, immutable data dump.
    │
    ├── docs               <- A default Sphinx project; see sphinx-doc.org for details
    │
    ├── models             <- Trained and serialized models, model predictions, or model summaries
    │
    ├── notebooks          <- Jupyter notebooks. Naming convention is a number (for ordering),
    │                         the creator's initials, and a short `-` delimited description, e.g.
    │                         `1.0-jqp-initial-data-exploration`.
    │
    ├── references         <- Data dictionaries, manuals, and all other explanatory materials.
    │
    ├── reports            <- Generated analysis as HTML, PDF, LaTeX, etc.
    │   └── figures        <- Generated graphics and figures to be used in reporting
    │
    ├── requirements.txt   <- The requirements file for reproducing the analysis environment, e.g.
    │                         generated with `pip freeze > requirements.txt`
    │
    ├── setup.py           <- makes project pip installable (pip install -e .) so whatif can be imported
    ├── src                <- Source code for use in this project.
    │   ├── whatif <- Main package folder
    │   │   └── __init__.py    <- Marks as package
    │   │   └── whatif.py  <- Python source code file
    │

A few things to note:

  1. The top level whatif folder will be called the project folder.
  2. A whole bunch of folders and files are created.
  3. You can delete folders and add folders depending on the project.
  4. This project uses what is known as a "src/ layout". Within the src folder is the main package folder, whatif.
  5. Within the whatif package folder, is an __init__.py file. We'll talk more about this later in the notebook, but for now, think of it as a marker signifying that whatif is a Python package.
  6. Also within the whatif folder, is an empty Python source code file named whatif.py. We can replace this with our current whatif.py file, or add code to this file, or delete this file. There is no requirement that we have a .py file with the same name as the package. We often do, but that's just a convention.

The whole "should you use a src/ folder within which the main package folder lives?" is quite a point of discussion in the Python community. Recently, it seems like using this src/ based layout is gaining favor. If you want to dive down this rabbit hole, here's a few links to get you going:

  • https://blog.ionelmc.ro/2014/05/25/python-packaging/#the-structure
  • https://github.com/pypa/packaging.python.org/issues/320

Adding files to our new project

Since we've got some work in process in the form of a few Jupyter notebooks and an early version of whatif.py, we can add them to our project. I've included these in the downloads folder for this module.

In fact, I've included my entire whatif project folder. You can find all files referenced below, in that folder.

Just copy all the stuff from my whatif/notebooks folder into the notebooks folder in your new project.

├── notebooks
│   │   ├── BookstoreModel.py
│   │   ├── new_car_simulation.ipynb
│   │   ├── new_car_simulation.py
│   │   ├── what_if_1_model_datatable.ipynb
│   │   ├── what_if_2_goalseek.ipynb
│   │   ├── what_if_3_simulation.ipynb
│   │   ├── what_if_4_project_packaging.ipynb
│   │   └── what_if_5_documentation.ipynb

Finally, replace the placeholder whatif.py and __init.py__ files file in the src/whatif/ folder with the working version upon which this project will be built - you can find these files in the downloads file as well in the src/whatif/ folder.

Version control

The very first thing we should do after getting our project initialized is to put it under version control.

Get a shell open in the main project folder created by the cookiecutter. Then we can initialize the project folder as a git repo:

git init
git add .
git commit -m 'initial commit'

Then go to your GitHub site and create a brand new repo named whatif. Since we already have an existing local repo that we will be pushing up to a new remote at GitHub, we do the following:

git remote add origin https://github.com/<your github user name>/whatif.git
git branch -M main
git push -u origin main

Now you've got a new GitHub repo at https://github.com/<your github user name>/whatif.

Source code editing

I would suggest using either PyCharm or VSCode to do any code editing to whatif.py. Of course, you could simply use a text editor. It's up to you. I'm going to use PyCharm and in the following screencast I demo setting up this project in PyCharm.

  • SCREENCAST: Setting up whatif project in PyCharm (4:30)

The whatif.py module - initial design

After completing Part 3 of this series, we had an example model class, BookstoreModel, and three functions that took such a model as one of the arguments and one utility function that was used to extract a Pandas DataFrame from the simulation output object (a list of dictionaries).

  • data_table - a generalized version of Excel's Data Table tool,
  • goal_seek - very similar in purpose to Excel's Goal Seek tool,
  • simulate - basic Monte-Carlo simulation capabilities,
  • get_sim_results_df - converts output of simulate to a pandas dataframe.

All of these were copied and pasted from their respective Jupyter notebooks and consolidated in the whatif.py file. This module can be imported and its functions used. While this is workable, let's try to generalize things a bit and improve the design.

In [1]:
%load_ext autoreload
%autoreload 2
In [2]:
import numpy as np
import pandas as pd
import matplotlib.pyplot as plt
import seaborn as sns
In [3]:
%matplotlib inline

Creating a Model base class

Everything we've done so far has used the one specific model class we created - BookstoreModel. In order to create a new model, we'd probably copy the code from this class and make the changes specific to the new model in terms of its variables (class attributes) and formulas (class methods). However, every model class (as we've conceived it so far) also needs to have an update method that takes a dictionary of model variable names (the keys) and their new values. Rather than the modeler having to remember to do this, it makes more sense to create a generic Model base class from which our specific model classes will inherit things like an update method. I also moved the __str__ function into our new Model base class.

All three of the analysis functions we created (data_table, goal_seek and simulate) rely on this specific implementation of update and require a model object as an input argument. Given that, it makes sense to move these functions from their current place as module level functions to class methods of the new base class, Model. You can find this new Model base class within whatif.py both in the downloads file for this module or at the whatif project GitHub site.

If you are new to OOP, check out this tutorial which discusses inheritance.

Adding new methods to BookstoreModel

Anyone who builds spreadsheet models knows that it's usually better to decompose large formulas into smaller pieces. Not only does this help with model debugging and readability, it provides an easy way to analyze components of composite quantities. For example, sales_revenue is based on the number of units sold and the selling price per unit. Our original implemenation buried the computation of number sold into the sales_revenue function. This makes it tough to do things like sensitivity analysis on number sold. So, we'll rework the class a bit to add some new methods. Notice, I've also added basic docstrings - more on documentation in a subsequent notebook.

Here's our updated BookstoreModel class. A few additional things to note beyond the new methods added:

  • it includes the Model base class within the parentheses in the class declaration,
  • it no longer has an update method,
  • it no longer has a __str__ method.

BookstoreModel will inherit update from the Model class. It also inherits __str__, but we could certainly include an __str__ method in BookstoreModel if we wanted some custom string representation or just didn't like the one in the Model base class. This is called method overriding.

In [5]:
class BookstoreModel(Model):
    """Bookstore model

    This example is based on the "Walton Bookstore" problem in *Business Analytics: Data Analysis and Decision Making* (Albright and Winston) in the chapter on Monte-Carlo simulation. Here's the basic problem (with a few modifications):

    * we have to place an order for a perishable product (e.g. a calendar),
    * there's a known unit cost for each one ordered,
    * we have a known selling price,
    * demand is uncertain but we can model it with some simple probability distribution,
    * for each unsold item, we can get a partial refund of our unit cost,
    * we need to select the order quantity for our one order for the year; orders can only be in multiples of 25.

    Attributes
    ----------
    unit_cost: float or array-like of float, optional
        Cost for each item ordered (default 7.50)
    selling_price : float or array-like of float, optional
        Selling price for each item (default 10.00)
    unit_refund : float or array-like of float, optional
        For each unsold item we receive a refund in this amount (default 2.50)
    order_quantity : float or array-like of float, optional
        Number of items ordered in the one time we get to order (default 200)
    demand : float or array-like of float, optional
        Number of items demanded by customers (default 193)
    """
    def __init__(self, unit_cost=7.50, selling_price=10.00, unit_refund=2.50,
                 order_quantity=200, demand=193):
        self.unit_cost = unit_cost
        self.selling_price = selling_price
        self.unit_refund = unit_refund
        self.order_quantity = order_quantity
        self.demand = demand

    def order_cost(self):
        """Compute total order cost"""
        return self.unit_cost * self.order_quantity

    def num_sold(self):
        """Compute number of items sold

        Assumes demand in excess of order quantity is lost.
        """
        return np.minimum(self.order_quantity, self.demand)

    def sales_revenue(self):
        """Compute total sales revenue based on number sold and selling price"""
        return self.num_sold() * self.selling_price

    def num_unsold(self):
        """Compute number of items ordered but not sold

        Demand was less than order quantity
        """
        return np.maximum(0, self.order_quantity - self.demand)

    def refund_revenue(self):
        """Compute total sales revenue based on number unsold and unit refund"""
        return self.num_unsold()  * self.unit_refund

    def total_revenue(self):
        """Compute total revenue from sales and refunds"""
        return self.sales_revenue() + self.refund_revenue()

    def profit(self):
        """Compute profit based on revenue and cost"""
        profit = self.sales_revenue() + self.refund_revenue() - self.order_cost()
        return profit

To help visualize the class structure, here is a simple UML diagram.

uml diagram

Using the Bookstore Model

Great, we've made some improvements both to BookstoreModel class as well as to the underlyng Model base class (which didn't exist before). However, if we try to create a new instance of BookstoreModel we quickly run into trouble. In fact, if we try to execute the cell above which defines the BookstoreModel class, we get an error saying that the Model class does not exist. Where is it? It's in the whatif.py module (which is not in the same folder as this notebook). Can't we just import it like we did in the Monte-Carlo simulation notebook?

In [4]:
from whatif import Model
---------------------------------------------------------------------------
ModuleNotFoundError                       Traceback (most recent call last)
Cell In[4], line 1
----> 1 from whatif import Model

ModuleNotFoundError: No module named 'whatif'

Nope. So, where does Python go to look for modules like whatif? It examines something known as sys.path.

In [5]:
import sys
print('\n'.join(sys.path))
/home/mark/Documents/sandbox/downloads_whatif_packaging/whatif/notebooks
/home/mark/anaconda3/envs/aap/lib/python311.zip
/home/mark/anaconda3/envs/aap/lib/python3.11
/home/mark/anaconda3/envs/aap/lib/python3.11/lib-dynload

/home/mark/anaconda3/envs/aap/lib/python3.11/site-packages

A couple things to take away from the sys.path list:

  • Python first looks in the current working directory,
  • from the remaining paths, we see that we are working in a conda virtual environment named aap.

Since the import of whatif failed, we can conclude that not only is whatif.py not in the current working directory, it also has not been installed in the conda aap virtual environment (that I created).

Of course, the whole point of this exercise is to turn whatif into an installable package so that we can use it from notebooks like this. Let's learn how to do that.

Creating the whatif package

You can find a tutorial on packaging a simple Python project here. Our example is pretty similar and certainly is simple. There are two critical files which we have yet to discuss - __init__.py and setup.py. Both of these were created by our cookiecutter and plopped into our project.

The __init__.py file

Well, this got more confusing after Python 3.3 was release in that now there are regular packages and namespace packages. For our purposes, we will just be considering regular packages and discuss a standard purpose and use of __init__.py. This file, which is often blank, when placed into a folder, marks this folder as a regular package. When this folder is imported, any code in __init__.py is executed. Here is the __init__.py file for the whatif package.

from whatif.whatif import Model
from whatif.whatif import get_sim_results_df

Just focus on the first line. That first whatif is the package (the folder) and that second whatif is referring to the module (the file) whatif.py. We know that the class definition for Model is in that file. After we install the whatif package (which we'll get to shortly), we could always import it for use in a Jupyter notebook with the statements like those above. However, by including them in the __init__.py file, we have imported them at the package level and can use these shorter versions in a notebook.

from whatif import Model
from whatif import get_sim_results_df

As the developer, we are including the lines in __init__.py to make it easier on our users by exposing commonly used objects at the package level.

Things can get way more confusing when we start to develop subpackages and have complex dependencies between packages, but for now, this is enough. For a good discussion of __init__.py, check out this StackOverflow post.

Installing our package and learning about that setup.py file

Finally, we are ready to create our whatif package and then "deploy" it by installing it into a new conda virtual environment. Wider deployment such as publishing our package to PyPI will wait. Since our project is in a public GitHub repo, others can clone our project and install it themselves in the same way we are about to install it. If we really aren't ready to share our project with the world in any way, we could simply make the GitHub repo private. Even free GitHub accounts get some limited number of private repos.

Like everything, it seems, in the world of Python packaging there are all kinds of potential complications and frustrations. We'll be trying to keep things as simple as possible.

The primary role of the setup.py file is to act as a configuration file for your project. At a minimum, this file will contain a call to the setup function which is part of the setuptools package, the primary way Python code is packaged for distribution. The setup function has numerous arguments but we will only use a small number of them.

# setup.py

from setuptools import find_packages, setup

setup(
    name='whatif',
    packages=find_packages("src"),
    package_dir={"": "src"},
    install_requires=['numpy', 'pandas'],
    version='0.1.0',
    description='What if analysis in Python',
    author='misken',
    license='MIT',
)

Most of the options are actually pretty self-explanatory. However, given our folder structure, two of these lines are particularly important.

packages=find_packages("src"),
package_dir={"": "src"},

The find_packages function is part of setuptools and we are telling setup that it can find our package folders inside of the src folder. See the following two links if you are interested in more technical details on these options and broader issues in the Python packaging world.

  • https://hynek.me/articles/testing-packaging/
  • https://docs.python.org/3/distutils/setupscript.
  • https://www.python.org/dev/peps/pep-0517/

Now we are ready to install our package. For that we will use a tool called pip - which stands for "pip installs packages". Backing up for a second, since we are using the Anaconda Python distribution, we usually use conda for installing packages. However, to install packages that are not in conda's repositories, we can actually use pip to install packages into conda virtual environments. Well, at least in Windows things work as I describe. It's not quite so easy in Linux (I have a note on this below).

Here's a short screencast that demos the following install process:

  • SCREENCAST: pip installing whatif (3:51)

Since we have not published our package to PyPI, we are going to install it from our local project folder. Open a shell and navigate to your project folder (it contains setup.py). Make sure you activate the aap virtual environment before installing your package. For example, we saw earlier in this notebook that my active conda virtual environment is called aap.

For development projects, I usually create a new conda environment to act as a sort of sandbox for trying out new packages. Typically I just clone my aap environment. However, we are just going to install whatif directly into our aap conda virtual environment.

With the aap environment activated, you can install the whatif package with:

pip install -e .

The -e means we are doing an "editable install". More on this in a minute. The "dot" means, install from the current directory (the one with setup.py in it).

You can actually leave this notebook running while you do the install. Okay, let's see if we can import from our new whatif package. You should first restart the Jupyter kernel (use the Kernel menu).

NOTE Before proceeding, I want to point out that the above procedure doesn't quite work in Linux. In fact, I've wasted so much time over the years on this issue, I finally wrote up a blog post to describe how to do this correctly in LInux. The trickiness arises because the version of pip that is in the virtual environment is not getting used - instead, the pip from the base environment gets used. See the following for how to deal with this in Linux.

  • Using pip with conda for local development projects
In [4]:
from whatif import Model

Yep, we can. IMPORTANT Scroll up and rerun the code cell in which the BookstoreClass is defined. Then we can create a default model just to show that things are working.

In [6]:
model = BookstoreModel()
print(model)
print(model.profit())
{'unit_cost': 7.5, 'selling_price': 10.0, 'unit_refund': 2.5, 'order_quantity': 200, 'demand': 193}
447.5

Well, looks like we forgot to include a __str__ method in the Model base class. Of course, we won't know what attributes are in the actual derived class (e.g. BookstoreModel), so we can add something generic like this:

def __str__(self):
        """
        Print dictionary of object attributes that don't include an underscore as first char
        """
        return str({key: val for (key, val) in vars(self).items() if key[0] != '_'})

Let's go do this in our whatif.py file and then figure out how to update our installed package.

Here's a short screencast that demos this change:

  • SCREENCAST: Adding code to whatif.py and committing changes (13:39)

Of course, after making this code change to whatif.py, we should stage and commit those changes in git and push our code to GitHub. The screencast above also demos this.

To learn more about the relationship between conda and pip:

  • https://www.anaconda.com/blog/understanding-conda-and-pip
  • https://www.anaconda.com/blog/using-pip-in-a-conda-environment

Using the Bookstore class revisited

We have seen two ways of using the whatif.py module as an importable library:

  • put it in the same folder as this notebook
  • install it into our conda aap virtual environment

If you do either of these things, then we can use the whatif library. I've installed it into the aap conda virtual environment by using the method I described above. Let's try it out.

In [7]:
from whatif import Model

We'll rerun our BookstoreModel class definition and then do the same kind of sensitivity analysis we did before with the original OO model.

In [8]:
class BookstoreModel(Model):
    """Bookstore model

    This example is based on the "Walton Bookstore" problem in *Business Analytics: Data Analysis and Decision Making* (Albright and Winston) in the chapter on Monte-Carlo simulation. Here's the basic problem (with a few modifications):

    * we have to place an order for a perishable product (e.g. a calendar),
    * there's a known unit cost for each one ordered,
    * we have a known selling price,
    * demand is uncertain but we can model it with some simple probability distribution,
    * for each unsold item, we can get a partial refund of our unit cost,
    * we need to select the order quantity for our one order for the year; orders can only be in multiples of 25.

    Attributes
    ----------
    unit_cost: float or array-like of float, optional
        Cost for each item ordered (default 7.50)
    selling_price : float or array-like of float, optional
        Selling price for each item (default 10.00)
    unit_refund : float or array-like of float, optional
        For each unsold item we receive a refund in this amount (default 2.50)
    order_quantity : float or array-like of float, optional
        Number of items ordered in the one time we get to order (default 200)
    demand : float or array-like of float, optional
        Number of items demanded by customers (default 193)
    """
    def __init__(self, unit_cost=7.50, selling_price=10.00, unit_refund=2.50,
                 order_quantity=200, demand=193):
        self.unit_cost = unit_cost
        self.selling_price = selling_price
        self.unit_refund = unit_refund
        self.order_quantity = order_quantity
        self.demand = demand

    def order_cost(self):
        """Compute total order cost"""
        return self.unit_cost * self.order_quantity

    def num_sold(self):
        """Compute number of items sold

        Assumes demand in excess of order quantity is lost.
        """
        return np.minimum(self.order_quantity, self.demand)

    def sales_revenue(self):
        """Compute total sales revenue based on number sold and selling price"""
        return self.num_sold() * self.selling_price

    def num_unsold(self):
        """Compute number of items ordered but not sold

        Demand was less than order quantity
        """
        return np.maximum(0, self.order_quantity - self.demand)

    def refund_revenue(self):
        """Compute total sales revenue based on number unsold and unit refund"""
        return self.num_unsold()  * self.unit_refund

    def total_revenue(self):
        """Compute total revenue from sales and refunds"""
        return self.sales_revenue() + self.refund_revenue()

    def profit(self):
        """Compute profit based on revenue and cost"""
        profit = self.sales_revenue() + self.refund_revenue() - self.order_cost()
        return profit

We'll create a new model instance and create a data table.

In [9]:
bookstore_model = BookstoreModel()

Let's define some scenarios to use with data_table. Profit will be our output of interest.

In [10]:
demand_scenarios = {'demand': [100, 150, 200, 250, 300]}

Now, since data_table is a method of our BookstoreModel class by way of inheriting it from the Model base class, we can simply use it with our just created bookstore_model object.

In [11]:
bookstore_model.data_table(demand_scenarios, ['profit'])
Out[11]:
demand profit
0 100 -250.0
1 150 125.0
2 200 500.0
3 250 500.0
4 300 500.0

If we look at all the available attributes of the bookstore_model object, we see that, yes indeed, data_table, goal_seek, and simulate are all available as methods.

In [12]:
dir(bookstore_model)
Out[12]:
['__class__',
 '__delattr__',
 '__dict__',
 '__dir__',
 '__doc__',
 '__eq__',
 '__format__',
 '__ge__',
 '__getattribute__',
 '__getstate__',
 '__gt__',
 '__hash__',
 '__init__',
 '__init_subclass__',
 '__le__',
 '__lt__',
 '__module__',
 '__ne__',
 '__new__',
 '__reduce__',
 '__reduce_ex__',
 '__repr__',
 '__setattr__',
 '__sizeof__',
 '__slotnames__',
 '__str__',
 '__subclasshook__',
 '__weakref__',
 'data_table',
 'demand',
 'goal_seek',
 'model_to_df',
 'num_sold',
 'num_unsold',
 'order_cost',
 'order_quantity',
 'profit',
 'refund_revenue',
 'sales_revenue',
 'selling_price',
 'simulate',
 'total_revenue',
 'unit_cost',
 'unit_refund',
 'update']

This shows a bit of the capabilities of OO programming. Yes, we could have designed our library differently and left those methods as module level functions, but this approach felt right for this application. There is not one way to do things in Python.

What happens when we make changes to whatif.py?

Our whatif package is under active development and we will make changes. What happens then? Similarly, what happens when we add additional files to the whatif package?

Option 1: Reinstall the package

We can redo a pip install . and away we go. Now, if we are using a Jupyter notebook to "test" our new code, we can avoid having to restart the notebook by using a little Jupyter cell magic. Including the following at the top of your notebook and running them first thing will cause all import statements to automatically reload if they detect changes in the underlying imported modules.

%load_ext autoreload
%autoreload 2

Option 2: Do an "editable" install

If you do a pip install with the -e flag, you do what is known as an editable install or installing in development mode.

pip install -e .

This is a common strategy during active development. By doing this, your import is actually using the code under development - pip is creating links to your source code instead of installing source files into some site-packages folder. Doing this along with the autoreload cell magic above provides an easy way to do simple package development in Jupyter notebooks. You can also make use of packages that were installed in this manner when using IDEs such as PyCharm. See https://packaging.python.org/guides/distributing-packages-using-setuptools/#working-in-development-mode for more info.

Concluding thoughts and next steps

We have gone over some basic concepts and techniques for:

  • creating a good Python project structure using a cookiecutter,
  • putting your project under version control,
  • improving on our original OO design by implementing a base class,
  • created an installable package for our growing, whatif library.

While we've certainly glossed over a bunch of details, we can revisit these topics later as we progress in our learning. In addition, there are numerous related topics that we will get to later in the course. For a preview of some these, I highly recommend the tutorial by MolSSI - Python Packages Best Practices. For example, we still need to address:

  • writing documentation (see the docs/ folder),
  • testing using tools like pytest,
  • continuous integration (automated testing),
  • uploading packages to PyPI.

With this current version of whatif, we can begin to try to port other spreadsheet models to Python. I've already done this with a typical multi-period cash flow model which revealed a number of interesting modeling challenges - see the new_car_simulation.ipynb notebook in the notebooks/ folder available from https://github.com/misken/whatif.

In [ ]: